Another morning walk to Ponce de Leon Park

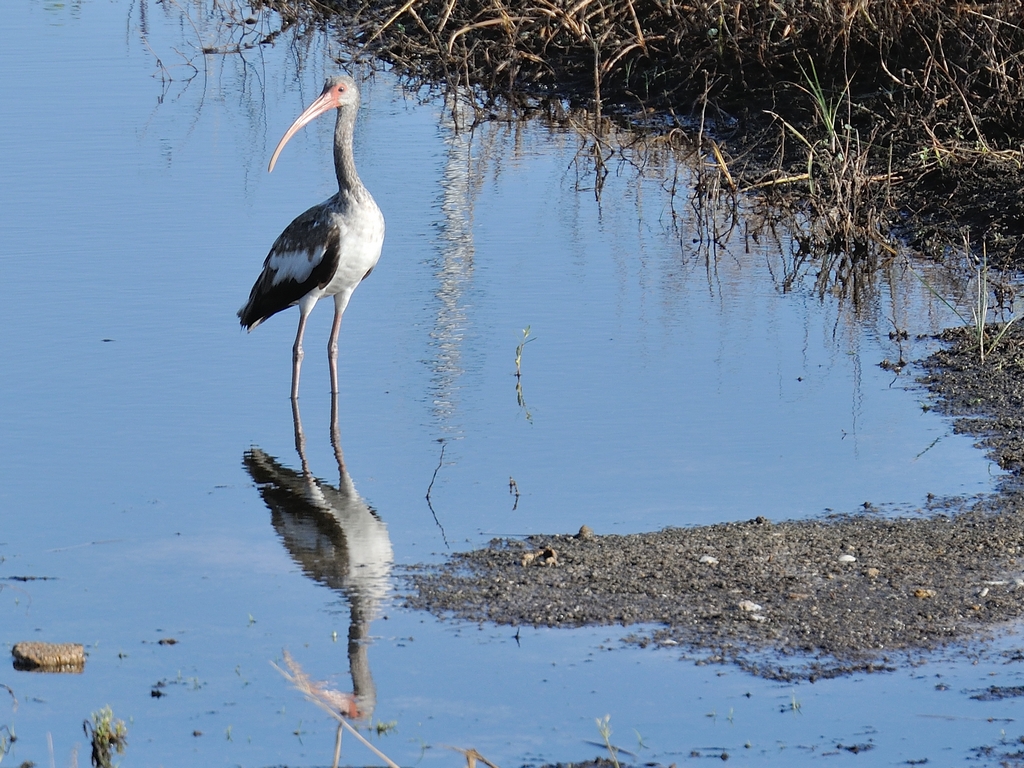
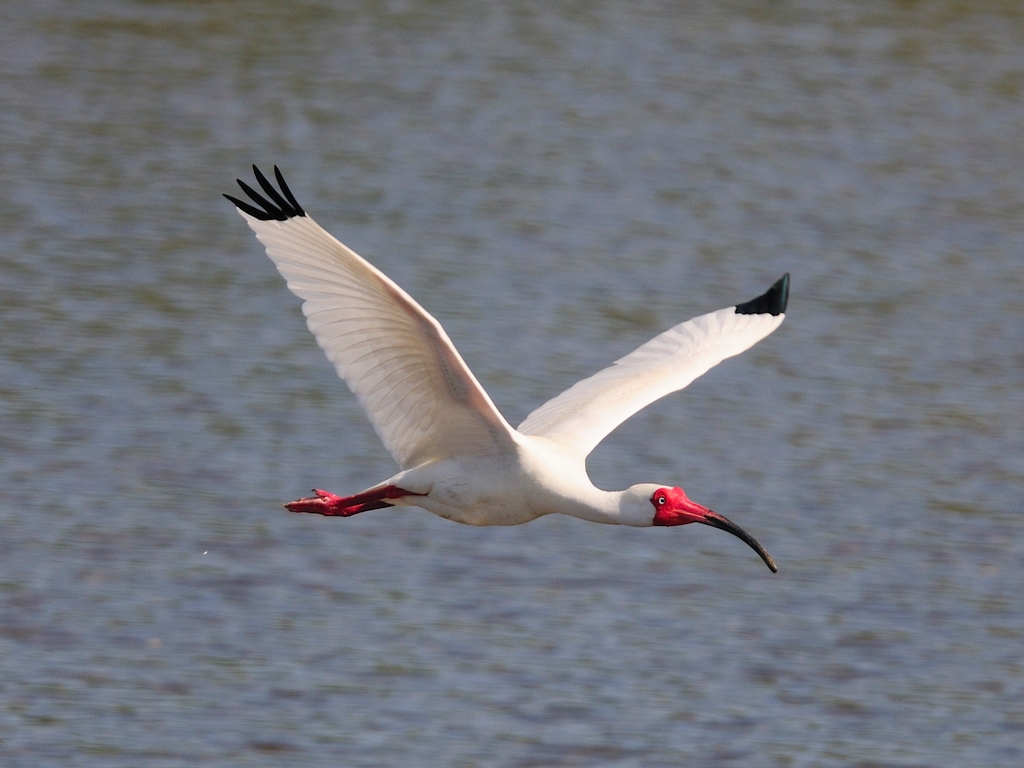
The other morning, I took another walk to Ponce de Leon Park in Punta Gorda. As usual, it was enjoyable not only for the exercise on a lovely morning but also for the things I see at the park and along the way. As I passed the big condo complex on Marion Avenue I found this immature White Ibis looking for breakfast in the puddles from the last nights rain.
DSC_7726acr107
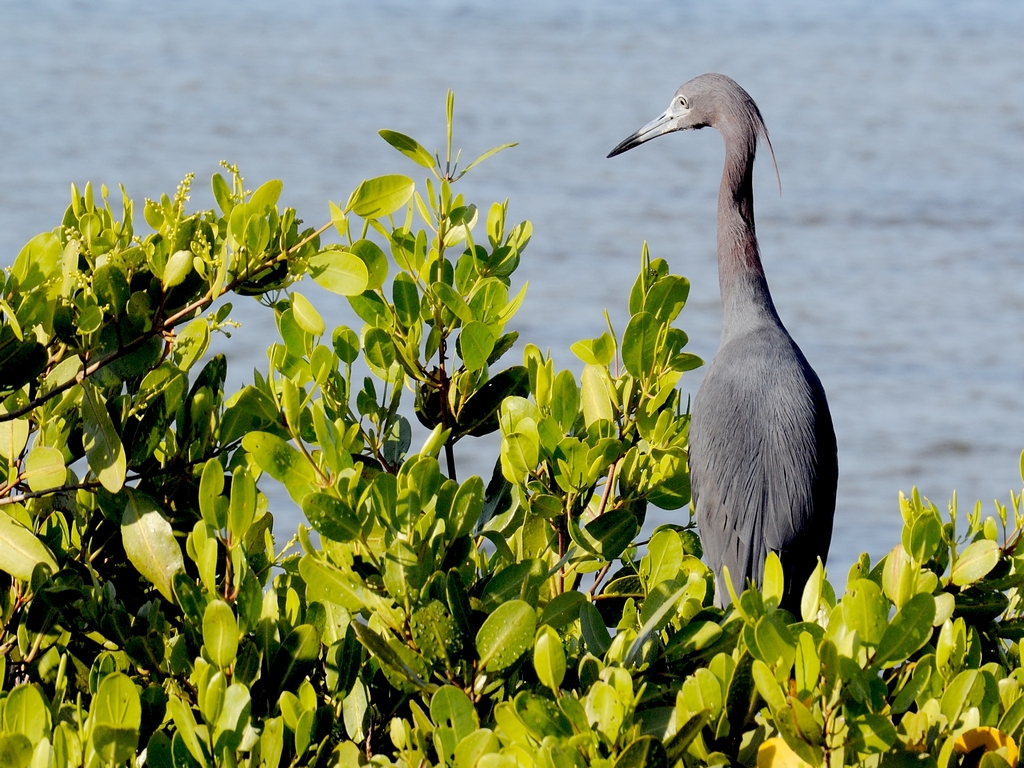
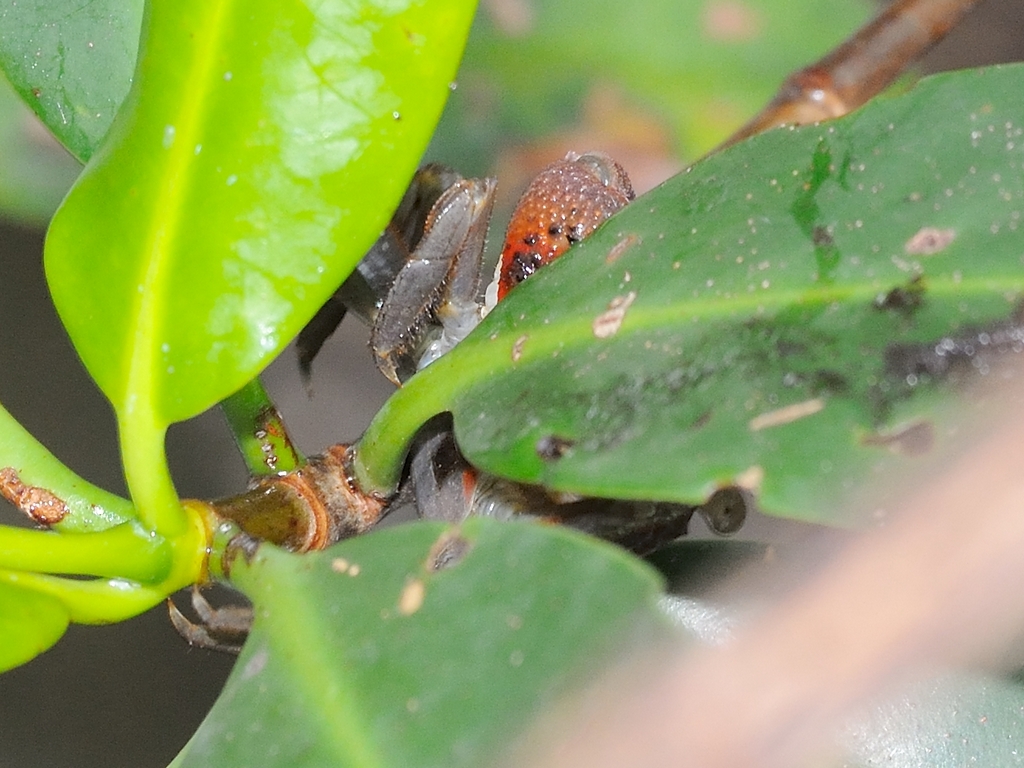
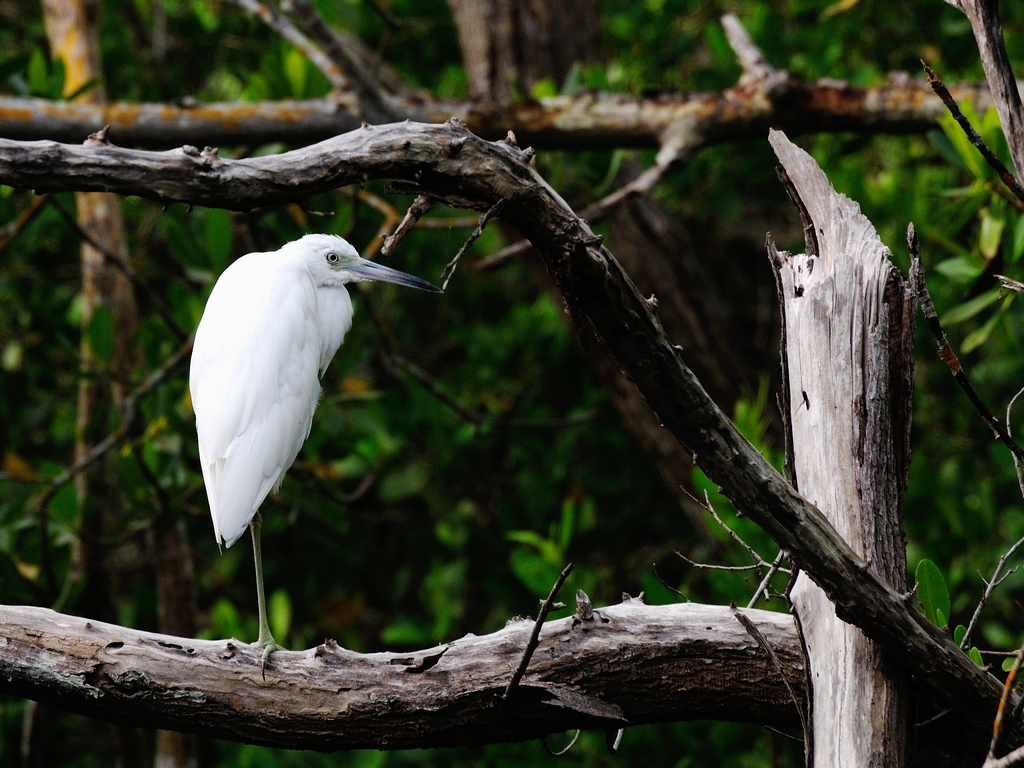
I think this Little Blue Heron must have read my last post about Mangrove Tree Crabs because he was walking around on the top of the mangroves looking for them.
DSC_7748cr107
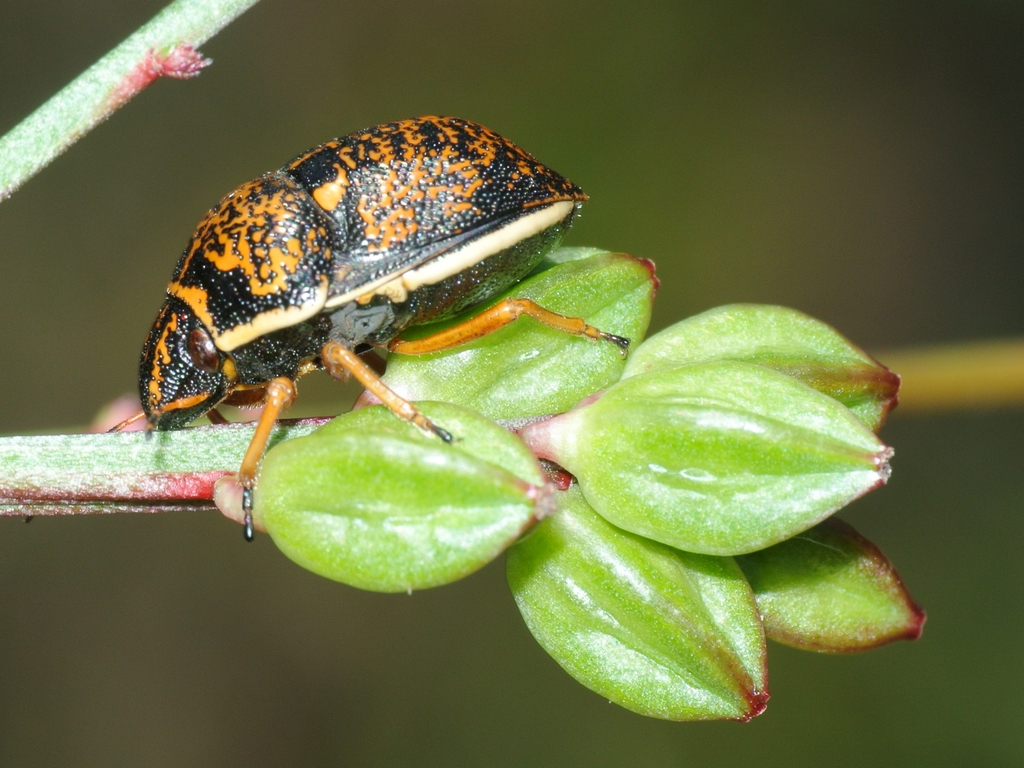
I noticed some movement on the sand. If I didn’t have the sea grape leave for a point of reference I wouldn’t have been able to find this small grasshopper. It really blended in well. Meanwhile, out in the shallows a fisherman was throwing a cast net.
DSC_7733acr107 DSC_7740acr107
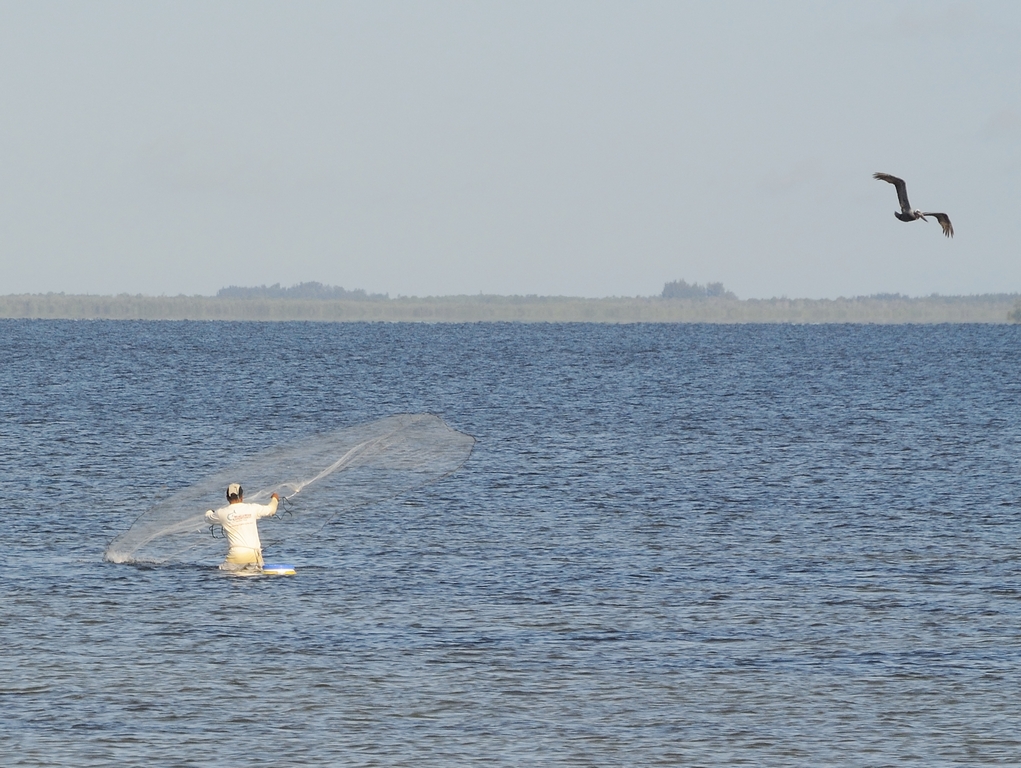
Casting a net usually looks pretty easy until you try it. It takes more strength and coordination than you might think to get it to fly properly.

Posted in animal behavior, Bird, Bug, Park - Ponce de Leon | Tagged , , , , , , | 1 Comment

Playing peek-a-boo with a Mangrove Crab

Mangrove Tree Crabs ( Aratus pisonii ) are cute little things. The local fishermen use them as bait and the Night Herons love them as snacks. I find them climbing in the mangroves along the nature walk in Ponce De Leon Park or just about anywhere you find mangroves in SW Florida.

Their first instinct when you approach them is to freeze. This makes them fairly easy to catch if you move slowly and then grab quickly. If you move too quickly, they will just drop off the branch.

They do keep a close eye on you though. This little one couldn’t completely hide behind the mangrove leaves but it tried to keep as much as possible hidden while keeping an eye on me. Their eyes are on stalks and can be moved in any direction. The pupil is a little black dot inside the stalk. In the picture on the left you can see an eye peeping through a notch in the leaf left by an insect. In the one on the right, it is just peeking around the edge of it’s foot.

DSC_7642acr107 DSC_7658cr107

Moving slowly I did manage to gradually move around the leaf to get a couple of better views.

DSC_7645cr107 DSC_7653cr107

Posted in animal behavior, Other Animals | Tagged , , , , | 1 Comment

V1 closeups with the Leitz ELPRO achromat lenses

I’ve mentioned using the Leitz ELPRO achromats with the V1 for some of the closeups below. I generally just put one on the lens I had on and let the subject guide the image. I wasn’t really worried about absolute magnification, just get the picture.

I decided to use the lenses to see how close I could get with both of the kit zoom lenses the Nikkor 1 10-30mm and the 30-110mm zooms. The setup was simple. I just put the V1 on a tabletop tripod, a triangular architects ruler on top of a picture frame and started shooting. I didn’t use manual focus. I let the AF determine the focus and slid the tripod back and forth until I could get no closer. Then I took a picture of the ruler focussed on the word ARCHITECT. Here is a shot of my super optical bench. Actually, it’s a countertop DSC_2873cr107 DSC_7402cr107
As shown, the V1 is on a small tabletop tripod and is wearing the 30-110mm at 110mm with both the ELPRO VIa and VIb installed. The picture on the right shows the two ELPROs and the Tiffen 40.5mm to Series VI step up ring.

The first thing I was surprised to find that the 10-30mm set at 30mm was able to get much closer than the 30-110mm set at 30mm. I don’t know why I was surprised. Using the lenses, I guess I tend to the Wide Angle end of the 10-30 and the telephoto end of the 30-110mm as starting points. That means that there isn’t really a transition where I would change lenses to get 28mm from the 30-110mm or 35mm from the 10-30mm those are things where you can take a step forward or back instead of changing lenses.  So, here are the results of the experiment.

First, the Nikkor 1 10-30mm at 10mm.

10-30 at 10mm no ELPRO

10-30 at 10mm no ELPRO

10-30 at 10mm with ELPRO VIa

10-30 at 10mm with ELPRO VIa

10-30 at 10mm with ELPRO VIb

10-30 at 10mm with ELPRO VIb

10-30 at 10mm with both ELPRO VIa and VIb

10-30 at 10mm with both ELPRO VIa and VIb

Now, the Nikkor 1 10-30mm at 30mm

10-30 at 30mm with no ELPRO

10-30 at 30mm with no ELPRO

10-30 at 30mm with ELPRO VIa

10-30 at 30mm with ELPRO VIa

10-30 at 30mm with ELPRO VIb

10-30 at 30mm with ELPRO VIb

10-30 at 30mm with both ELPRO VIa and VIb

10-30 at 30mm with both ELPRO VIa and VIb

Now for the Nikkor 1 30-110mm at 30mm

30-110 at 110mm no ELPRO

30-110 at 110mm no ELPRO

30-110 at 30mm with ELPRO VIa

30-110 at 30mm with ELPRO VIa

30-110 at 30mm with ELPRO VIb

30-110 at 30mm with ELPRO VIb

30-110 at 110mm with ELPRO VIa and VIb

30-110 at 110mm with ELPRO VIa and VIb

and finally the 30-110mm at 110mm

30-110 at 110mm with ELPRO VIa

30-110 at 110mm with NO ELPRO

30-110 at 110mm with ELPRO VIa

30-110 at 110mm with ELPRO VIa

30-110 at 110mm with ELPRO VIb

30-110 at 110mm with ELPRO VIb

30-110 at 110mm with ELPRO VIa and VIb

30-110 at 110mm with ELPRO VIa and VIb

So, that’s it. The two kit lenses at extremes with a pair of high quality achromats to provide close focus capabilities.

You will definitely see shots from these combos as time goes on. Here is one to start with.
DSC_7075cr107

Posted in Camera Gear, Photography, Shooting closeups | Tagged , , , , , , | 2 Comments

Some White Bird Pictures

There are a lot of white birds around the florida coast and into the flatwoods. From a distance many look alike but, they aren’t too hard to tell apart with some knowledge of their characteristics. There are so many of them that the Peace River Audubon Society actually calls their newletter The Whitebird. Here are some notes on how to identify them.

Great Egret Ardea Alba
DSC_1682acr107    DSC_4491acr107

The flight image shows the Great Egret with the green breeding color surround of the eye.  In the second picture you can see a Great Egret in the background with a Snowy Egret in front of it.  This gives you an ide of the relative size.

Snowy EgretEgretta Thula

As you can see above, the Snowy Egret is much smaller.  It also has yellow feet or, when younger, yellow legs.  They are a lot more active birds than the great egret too.

DSC_4554acr107       EGRET Snowy - Egretta Thula_4259a_cr107

They even feed on the wing as you can see as they drive off a laughing gull from a school of fingerling fish.  Their breeding eyepatch is a bright yellow.  To match their socks, I guess.

DSC-8219cr107  DSC_6914acr107

Cattle EgretBubulcus ibis

There is another egret of similar size called the Cattle Egret.  You won’t find it feeding on the fly and will seldom find it in salt water.  It is generally in larger groups than the coastal herons and egrets.  It likes to hang around in pastures and fresh water ponds with cattle who disturbed the earth and kick up the grubs it feeds on.  I guess they aren’t too smart though because I found a flock of them wondering why this cow had such short legs and such a big tail.

DSC_4575cr107    DSC_3522acr107

They also have some tan/brown feathers on the tops of their heads and backs which differentiate them from the Snowy Egret.  They also lack the yellow feet of the snowy.

Little Blue Heron – Egretta caerulea

The Little Blue Heron is a white bird?  Yes, it is in it’s immature phase.  It starts off as a white bird and goes through a pied phase as it reaches it’s adult plumage.  Here are pictures of both phases.

DSC_6299acr107    DSC_7083acr107

The grey around the face and legs makes it fairly easy to differentiate between the immature Little Blue Heron and the other small white birds.

White Ibis – Eudocimus albus

This one is pretty easy to identify.  The downward curved beak is a real tipoff in case you miss the color of it.  These can be found anywhere.  Sometimes they wade and others dig around for grubs in the ground.  Their maturing colors are the opposite of the Little Blue Heron.  They start off as a brown bird and go through a pied phase as they turn white.  On the ground and in the air, you can see just a bit of black at the tips of the wings.DSC_0283a_cr107

DSC_5327acr107    IBIS White - Eudocimus albus _4736cr107

Wood Stork – Mycteria americana

The final white bird is the Wood Stork.  It is the only member of the stork family native to North America.  The crackers call the wood stork Iron Head because of it’s appearance.  Like the Ibis, it has a curved beak and shows black areas on it’s wings.  Here are a couple of shots of it.

DSC_4400acr107    DSC_8078acr107

It’s pretty obvious where the Iron Head name comes from.  They are often seen together with Ibis since they are similar in feeding habits.  They like soft ground to dig in to.  Here is a shot of a mixed flock of Ibis and Wood Storks.  You can easily tell which is which from the size and color patterns.

DSC_2908ea_cr107

Of course, this list of white birds doesn’t include all of the gulls and terns that you will find in Florida.  Maybe I’ll do that another time.

Posted in animal behavior, Bird | Tagged , , , , , | 2 Comments

One last action post

The Nikon V1 has an electronic shutter as well as a mechanical shutter. Some electronic shutters have problems at higher shutter speeds and moving subjects. They cause some distortion called a ‘rolling shutter effect’. Today, I was out looking for some bugs to shoot and noticed softball practice on a nearby field. I went over and tried the Electronic High Speed option of the V1 to get these shots. I don’t see anything that looks like anything other than motion blur on the bat or ball in any of these pictures.

DSC_7104cr107 DSC_7117cr107

DSC_7129cr107 DSC_7141cr107

And, part of a 10fps sequence of outfield action

aDSC_7172 bDSC_7173

cDSC_7174 dDSC_7175

eDSC_7176 fDSC_7177

gDSC_7178

As usual, just click for a larger image.

Posted in Camera Gear, Photography | Tagged , , , , | 1 Comment

Shooting action – New school

OK, even when I was shooting with the Crown Graphic, I envied the pro sports shooters with the motor drive to advance the film and someone elses money to pay for the developing.

Now, every point and shoot will take sequences at some number of “frames per second” or fps.  My D90 will shoot at 4.5fps, the D300 at 6fps and the V1 at 10fps.  That sounds like it makes it easier and in many ways it does.  But, you still need to think about what you are shooting as action and how to approach it.  Just like the old film cameras that would run out of film and need reloading, the modern camera will have buffer size limitations that will stop your action in it’s tracks.

To start with, you need to decide if the action you are shooting is continuous or a particular instant that you want to capture.  Continuous action is very amenable to using the  ‘motor drive’ to continue shooting until the buffer is full.  It is characterized by sudden change that cannot be anticipated.  The desire for a specific instant though means that you might as well be shooting old school and consider the fps as just a way to make it a little easier.

In either case, you are going to get better shots if you understand the rhythm of what you are shooting and what cues you can use to start shooting.  Here are a couple of shots taken from a post about a rodeo in arcadia a couple years ago.

DSC_3633aweb

The bullrider was an example where the action was continuous and unpredictable.  I was just blasting away with the D300 and 70-300mm VR lens to get as many pictures as possible.  The zoom allowed me to get to the point where the action pretty much filled the frame and the Automatic Focus followed well.  Even then, I was using short bursts which were keyed by the sound of the bull hitting the ground.  My reaction time was such that if I shot three frames at the sound, I got the bull going up, at the peak and going down.  I almost never got one looking like a static shot with all four feet on the ground.

DSC_3695web

The second shot is an example of one where I wanted a particular instant.  Between the rides, the ring crew had to get the animals out for the next rider.  I watched this as a spectator a few times, took a couple of shots and then saw the image I wanted to capture.  When they do this, the inside rider gets his lariat on the animal but, doesn’t actually try to control it.  You don’t really want to be pulling an angry beast that weighs more than you and your horse toward you.  Once that line is on, the outside rider ropes the animal and with two lines, they can safely control it.  To get the single instant shot you need to have a cue.  To find that, you need to watch the action for a while without shooting while visualizing the instant you want to catch.  In this case, it was the arm movement of the second cowboy as he threw his lariat.  This happens quickly.  If you tried to get it blasting away, it would be a matter of luck to get the shot you want.  After all, that cue only lasts an instant.  If you start to soon, the camera buffer is full before you catch it.  Start too late and the loop is already on the bull.  In this case, I was shooting a single frame each time his arm came forward.  I finally got the shot I wanted and as it happens the lighting and position of the bull were near perfect (to my mind).  I even got lucky with the bull being airborne emphasizing it’s speed and power.

Posted in Camera primers, Event, Other Animals, Photography, Rodeo | Tagged , , , , , , , | Leave a comment

Shooting action – Old School

A couple of posts on internet forums about shooting action shots reminded me of shooting sports in high school. Most of my action shots now involve wildlife and for a while I shot equestrian events. Those are all different sorts of action and each requires a slightly different approach to use your gear effectively. But, amidst the talk of high frame rates, electronic flash, autofocus points and modes I started to remember shooting with a 4×5 Crown Graphic film camera. The film was in holders that had to be loaded and unloaded between shots. Oh, and don’t forget to put the dark slide in and take it out and make sure the color code indicated whether it was exposed correctly. To show you what the camera looked like, here is an image from the filmphotographyproject.com.
weegee
The photographer is Weegee. The flashbulbs were about the size of a 60 watt light bulb. In later years, they were replaced with a Heiland Strobonar which was about as big of a flash unit but also required a wet cell battery carried over one shoulder. The other shoulder was used to carry the film carriers.

You could actually shoot 2 or 3 shots a minute with a bit of practice but, if you did that, you got yelled at for wasting film. In order to get the shot, you had to be in the right place, have the flash exposure calculated for some position and then get the shot. Here are a few examples from a long time ago.

Ybk-005crop 1 Ybk-006crop

For football, you needed to focus somewhere on the field where you expected the play to go and wait for the action to get there. If they ran the play to the other side, you missed it. No zoom lenses. Exposure?  Easy, figure the distance you were going to shoot at and use the guide number for the bulbs you were using.  ISO?  Oh yeah, it depended on what film was in the folder and how much you wanted to push it in the developer.     With basketball, you did pretty much the same.  Use the rangefinder to pick a focus point like the basket or one of the foul circle lines.  In these, I used the basket.  In the first, the layup came from a drive straight down the middle and the player shooting was in focus.  In the one on the right, the defender got to the basket before the shooter and the shooter stopped short for a jump shot.  Yeah, the main subject is a bit out of focus but, in sports, catching the action is the key and technical issues become secondary.

Ybk-008crop Ybk-009c
And, for my moment of reflected glory, the coach seated on the right is Chuck Knox. My High School was his first head coaching job. He later went on to coach the Seattle Seahawks in the NFL.
Ybk-007crop
I’ll post later about current action shooting issues.

Posted in Camera Gear, Photography | Tagged , , , , , , | Leave a comment

Using the Nikon V1 with the Nikkor 70-300mm VR lens

When I got my V1 I also got the Nikon FT-1 adapter which allows me to use modern AF-S Nikkor lenses on the camera. I haven’t used it a lot because I am generally happy with the 10-30mm and 30-110mm 1 Nikkors that are designed for the camera. They make an excellent walk-around kit.
Today, I was stuck at the house and looking for something to do. I already had plenty of shots of the bees in the magnolia. I noticed the 70-300mm on the D90 and decided to see how it worked with the V1. These shots were taken with the V1 / FT-1 / 70-300mm combo on a lightweight monopod.

I took a shot down the canal at a sailboat on the other side at the marked focal lengths of 300, 200, 135, 100 and 70. I missed the 135 setting by a little bit so ended up with 140mm for one of the shots. Here they are in the order of 300 to 70mm. All of the images here are straight from the camera jpegs resized to 1024×768 for use on the web. The cropped shots are all from the original jpegs and were not resized before cropping. Here is a shot of the boat at 300mm which is equivalent to 810mm in 35mm terms.
DSC_6447-300-810
Here are crops from the center of that image and the bottom left corner.
DSC_6447-300-810crctr DSC_6447-300-810crbl
Here are the shots at 200mm(540) and 140mm(378)
DSC_6448-200-540 DSC_6449-140-378
and the shots at 100mm(270) and 70mm(189)
DSC_6450-100-270 DSC_6451-070-189

These certainly look like a satisfactory result to me. Then, I noticed one of the bee beaten magnolias and tried a shot at about 100mm to see how it worked at a closer distance. Here is the shot resized to 1024×768 as above and a direct crop of the center from the full image. For all of these, you can click for a larger view.
DSC_6453 DSC_6453crctr

Posted in Camera Gear, Photography | Leave a comment

A few more from the Magnolia

I thought I would add a couple of more shots of the bees working on the Magnolia blossom. I found a blossom that was still at the cup phase and took a shot to show what it was like before fully open. You can see that the pistils are green and the stamens are closed tightly to the stock. But, once the blossom begins to open, the colors change and the stamens begin to seperate as the pollen appears.

DSC_6223acr107 DSC_6278acr107
The large part that looks like an oversized stamen is actually a blossom petal that hadn’t fully developed. The bees kept trying to work around it to tear off the stamens but, it was really interfering with their efforts. I don’t usually interfere with my subjects (particularly those that can bite or sting, Florida is NOT a petting zoo.) but in this case, I flicked the underdeveloped petal off to let them have better access.
DSC_6290acr107 DSC_6311acr107
The bees quickly moved the backlog down into the cupped petal and got back to stripping the stamens from the stalk.

Posted in animal behavior, Bug | Tagged , , , , , | Leave a comment

Bee happy, the magnolias are in bloom

Every year our magnolia trees bloom and it’s a feast for the bees. They are actually gathering pollen instead of nectar. The magnolia blossom first starts as a closed cup filled with fragrance. That draws the bees to it immediately but, they cant get into it just yet.

DSC_5908cr107    DSC_5909cr107

In a few hours, the inner blossom begins to open and the bees immediately start pulling the stamens off the bud. The open blossom forms cups which hold the dropped stamens and the bees land and roll into them. They are busy for a couple of hours packing pollen into the pollen bags on their legs.  Occasionally, they will return to get some of the sap which does come out where the stamens have been but that doesn’t seem to be their primary purpose.

DSC_5881acr107    DSC_5895acr107


Posted in animal behavior, Bug | Tagged , , , , , | 2 Comments