Charlotte Flatwoods Environmental Park – A short walk

The 487 acre Charlotte Flatwoods Environmental Park is managed by Charlotte County.   It is located between Punta Gorda and Ft. Myers at 15801 Tamiami Trail, Punta Gorda, 33955.   The entrance is right on US-41 as you near Zemel Road.   There is a paved parking area at the entrance but, you can drive through onto a hardshell road.

Today was just a short walk on the main path to see what the park was like.  I had been there a couple of years ago before much work had been done on it.  I’ve driven by it several times since but, today was the first time I stopped to look around. 

About .25 miles down the road from the gate is a another parking lot and another gate.   This  entry gate is generally locked with a walkaround at the side.  It appears to me that wheelchair access is possible through the walkaround with a bit of maneuvering.


Once through the gate you find a hardshell road which is easy to navigate as far as a rest area with a picnic table.   There are drainage ditches to either side and these are overgrown with marsh grasses and foliage.  In season, they are abundant with dragon and damselflies.   The area is also rich with wildflowers in season.

The rest area was a pleasant place to stop on my brief walk.  At this point, the trail goes right and enters the flatwoods or to the left it borders a large grassy marsh.  Even on the flatwood portion, the marsh is not far away and a few steps up the bank gives you a fine high view over the grassy marsh.  The undergrowth in these woods is light and it is an invitation to walk off the path and deeper into the woods.  Unfortunately, I wasn’t dressed for that today so stayed on the path.

A few steps up the bank from the picnic bench yields a great view over the marsh.

The hiking paths are marked by colors and the path around the marsh is the red path.  I followed it to the left around the marsh.  The path there is a hardshell grade which is easily passable.  There are some rises but none are strenuous.  The full path around the marsh is about 1.5 to 2 miles.  I only did about a quarter mile on either side of the rest area.  The grade is well above the marsh level and so provides excellent viewing.  I was there at about 2:30 PM and there wasn’t much activity.  Mornings or evenings would undoubtedly be better.  This is one view looking across the marsh from the left branch of the path.  The rest area is along the treeline to the right.  The treeline is also along the path.  Note the self portrait bottom left 🙂

The path to the right from the picnic area runs below the bank surrounding the marsh.  You will be surrounded by trees.  On the first leg, you will hear and see traffic on US-41 through the trees.  Although still close to the marsh, this part of the primary trail is pine flatwood.  A few yards away is a rougher trail which follows the border of the marsh.

The palmetto in the undergrowth isn’t as dense as it appears.  This would be a pleasant off trail walk if dressed accordingly.  Remember, Florida is NOT a petting zoo.  This is prime habitat for the Eastern Diamondback Rattlesnake. 

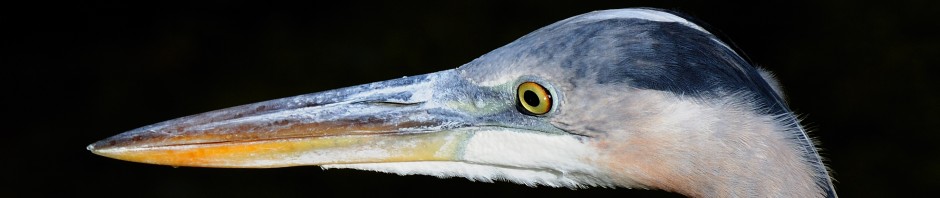
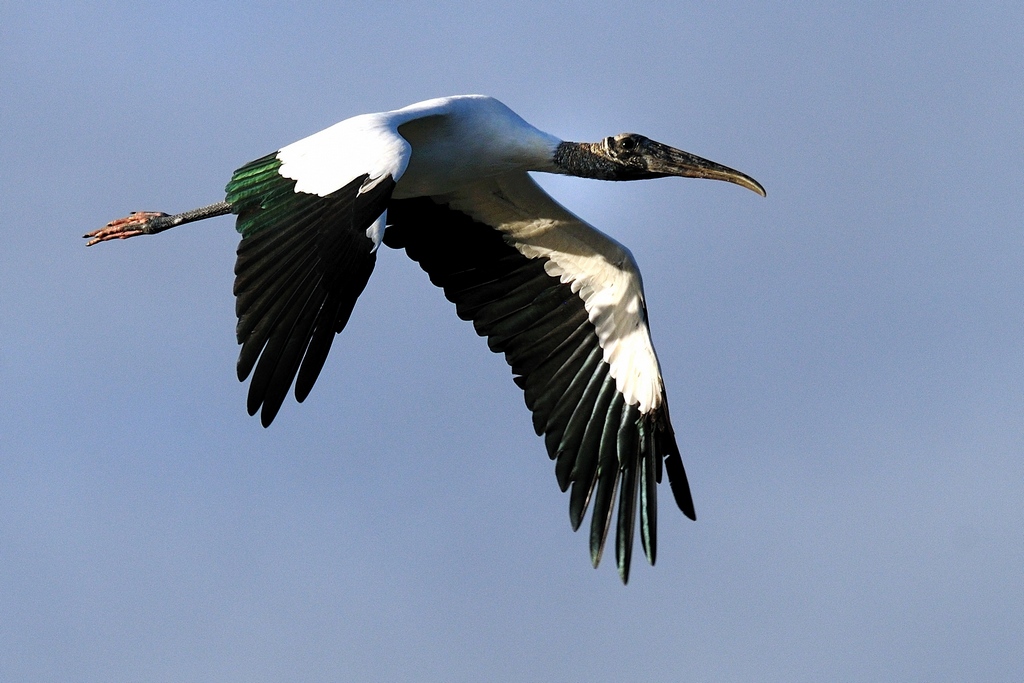
Here are a couple more views from the  park.  Check the link in the first paragraph for information from the Charlotte County website.


Posted in Park | Tagged | Leave a comment

Shooting closeups – Macro lenses

Macro lenses come in two categories.  there are normal lenses which have a ‘macro’ switch which  extends the focus distance by allowing a little closer shooting within some limitations and then, there are specialized macro lenses.  Modern specialized macro lenses will usually get to a 1:1 magnification ratio without external devices like extension tubes or bellows.

The Nikkor 24-85mm f2.8-4.0 is an example of a normal lens with a macro capability.  this is a reasoable lens for most daily shooting and the macro capability lets you get a little closer when you find something interesting.

This shows the macro switch and orange markings for the macro range on the 24-85mm.  The macro range is only available from 35mm to 85mm and it does not extend to a complete 1:1 magnification ratio.  If the switch were in the normal range, the focus would stop at 0.5 meters as shown.  To show you the range, these pictures were taken at the 85mm normal and 85mm macro range.


By way of comparison, the picture to the right was taken with the 105mm f2.8 VR Micro-Nikkor set to 1:1 magnification.

So, normal lenses that can have an extended focus range can be useful for closeups they are not a replacement for a true macro lens when you get really close.  BTW, if you click on this one you will see I really need to dust my camera bag.

At present, I have three ‘real’ macro lenses capable of achieving 1:1.  They are the 55mm f3.5 Micro-Nikkor from the 70s, the more modern 60mm f2.8D Micro-Nikkor and the  105mm f2.8 VR Micro-Nikkor.  Why three?  Well, each has it’s purpose.  I’ve had the 55mm since new but, it is a non-AI lens and is not recommended for mounting on digital cameras without modification.  I decided not to modify mine but, it is still useful when mounted on a bellows.  The 60mm f2.8D is a good lens for close work like copying documents or small product photography.   I use the 105mm f2.8 VR for field photography because it gives me a better working distance.  Speaking of working distance, here are the three lenses.  On the left, they are all at infinity focus and on the right they are all at 1:1 magnification.  You will notice that the 105mm does not change size as the focus is changed from infinity to 1:1 magnification.  That is because it is an internal focussing (IF) lens which does not change length as focus occurs. 

That is not true of either the 55mm or   60mm.  In fact, you can see that they extend quite a lot.  The 55mm actually needs an extension tube to achieve 1:1 focus.  Older versions of the lens included the M2 extension tube which allowed for automatic diaphragm operation and later versions with the PK-3 tube which also coupled to the meter prisms of the Nikon F, F2 and F3.  The 55mm on the left in both pictures is shown with the PK-3 mounted to give 1:1 in the right picture.

Posted in Camera Gear, Shooting closeups | Tagged | Leave a comment

Wood Stork – Mycteria americana

The Wood Stork is the only stork that breeds in North America. Breeding colonies are found from Florida to North Carolina. Here in Punta Gorda, there is a rookery on an island in the Peace River above the I-75 bridge.

I see them a lot in the marshy areas and occasionally the mangroves below Ponce De Leon Park but they can also be found around the marshy pond across Olympia Avenue from the Visual Arts Center.  They generally travel in groups but individuals can be found.

This morning, one flew by with a good sun angle as I was at Ponce Park.  I like this shot because it shows the irridescence of the wing in the dark areas.  That area usually turns out to be black in most pictures.

Locals call these birds ‘Ironheads’ because of the beaten iron appearance of their bald heads.  If you don’t see them in marshes, feeding in small groups, look up.  When not feeding, they tend to gather in groups in trees with good visibility.

Posted in Bird | Tagged | Leave a comment

Shooting Closeups – Closeup filters and positive diopter lenses

One of the options to shoot closeup is to add magnification in front of your existing lens.  There are lens attachments called closeup filters or positive diopter lenses.  They are all the same thing but some are better than others.

The typical positive diopter lens is sold as part of a kit and often comes with it’s own case.  Here’s an example of a set of B+W single element closeup lenses.

The kit shown here is a pretty normal item and usually sells for less than $100 for the whole kit.  These kits are almost always single element lenses.   Each lens is identified by a number which indicates it’s magnifying power.  A kit usually has +1 to +4.  The lenses can be stacked, that is more than one put on your primary lens at a time.

All of the single element lenses will have problems with spherical and chromatic abberations because different colors of light focus at different planes.  Better closeup lenses have two elements and are usually referred to as apochromats.  The two elements are used to correct the spherical and chromatic abberation and generally do so very well.

Because they have two elements, they are thicker and heavier.  It’s pretty obvious when you compare the two.  A single element lens is no thicker than a filter while the apochromats are twice as thick.  The two element lenses may be referred to as doublets by some.

Nikon used to make two element apochromat lenses which were designated 3T and 4T in 52mm sizes and 5T and 6T in 62mm sizes, etc. but, these are no longer in production.  Nikon also made single element and referred to them as No. 0, No. 1 and No. 2. The lower magnifications didn’t need as much correction as the higher.

Canon still makes the 250D and 500D in a number of filter sizes.  The 250D is designed for short lenses and the 500D for longer lenses.  There are other vendors of true apochromats as well

The magnification that you will get with these lenses is a function of the focal length of the primary lens.  It will be different between a 50mm and a 135mm for example.

Pros

  • These are relatively cheap and easy to use. 
  • Because they are stackable you can often get just the right magnificaton.
  • There isn’t much distortion of image quality at lower magnifications
  • There is little effect on the f-stop

Cons

  • You will lose infinity focus with the lens in place
  • The focus range can be small and may need multiple tries to get the right combo
  • At stronger magnifications, some chromatic and spherical abberation can occur

I don’t have any examples of the use of these lenses since I moved to digital.  I found them fine for occasional use but, my interest in closeup work led me to better options fairly quickly.  The set shown was purchased to allow some closeup work with a Mamiya 645 film camera.

Posted in Camera Gear, Camera primers, Shooting closeups | Tagged | Leave a comment

I need to learn to cut mattes and frame

One of the things about this blog theme is the banner image at the top of thepage.  Sometimes it’s tough to find a shot that looks good in the long proportions needed. 

Looking through other pictures I realized that using standard cropping ratios like 4×6 and 8×10 just didn’t do justice to some shots.  Some were left with acres of empty space, too much of a crop and some just didn’t feel right until I went to freehand and cropped the way I wanted them. 

I decided to try the banner format on some of them.  These weren’t intended to be panoramas but, they just turned out that way. 

Posted in Bird | Tagged | Leave a comment

Babcock-Webb WMA – Seaboard Grade – Tucker to Tram

Seaboard grade is the third intersection on Tucker Grade, the main road into Babcock-Webb.  It’s a pretty rough road and not really suitable for cars but, any vehicle with a reasonable ground clearance can travel the whole length between Tucker and Tram Grades.  Seaboard extends completely along the border of the recreational area but, I will concentrate on the area between Tuckers Grade on the south and Tram Grade on the North.  This is one of my favorite places in Babcock-Webb.  Only Tucker and Tram Grades well east into the hunting area surpass it.

The intersection of Tucker and Seaboard shows one of the water management sumps on the north side of the intersection.  These control waterflow and levels throughout the WMA and are usually left open.  If you are looking for alligators, these are good places to start.

With a car, you can turn left from Tucker and go a couple of hundred yards down to the first drainage crossing.  This is actually a good place to stop and wait for nature to come to you and there is room to park off the road in a couple of places.  After that few hundred yards, the road gets a bit rougher.  This is the view of the entrance and while it looks forbidding, opens up after the first close foliage.

Once past that first tight spot, you will find a wider road with a marl pond on the right and seasonal wetlands to the left.  This is about as far as I would want to take a car or minivan but, higher ground clearance vehicles can go all the way to Tram Grade. 

You can see the wide area here where you can park to walk along the pond and beyond.  This is a good place to view alligators and there is a colony of Red-winged Blackbirds that can often be seen walking on the pond foliage.  Most of the Florida wading birds will also be found here.  At about the midpoint of the marl pond, you will find another sump which has a road crossing.  There is also one of the old fords which were used before the sumps and controls were installed.  In this picture, you are looking in to the ford and the control sump can be seen on the left.

This is a really great place for macro shooting since the undergrowth is shoulder high and the year round water makes for good growth and food possibilities for critters.  The other side of the sump is another great place to find alligators but, remember, Florida is NOT a petting zoo.

 Beyond the sump, the marl pond turns into a drainage canal on the right and stands of old pine line the road.  In the underbrush you can sometimes find evidence that this was once grazing land but, successive controlled burns have eliminated most of those traces.  In summer, the shade of the old trees provides some respite from the heat and the trees often are home to small birds.  This area is one of the places where the Red-cockaded Woodpecker feeds and occasionally you can see the white stripe painted on a tree trunk indicating a confirmed nesting site.  These are more evident along Tram Grade but, there are fewer places to stop on Tram.  This is a fairly typical location.  The road is on the extreme left and is surrounded by the pines.  At the time of this photo, the water level was somewhat high.  Normally, the canal is narrower.

Eventually, you will end up at the intersection with Tram Grade.  This also features a sump and I have nearly always found alligators here.  In fact, for several years I found very young ones on the southern side.  When you find small gators, be very, very careful.  Unlike most reptiles, female alligators stay in the area and protect their young from predators (including other alligators).  They are very protective to the point of aggressive behavior even when no harm is intended.

This final picture is the intersection of Seaboard and Tram Grades.  The hardshell road in the foreground is Tram and Seaboard continues to the  north.  From here, Seaboard Grade goes on to the end of the property on Bermont Road but, there is no vehicle access there. 

Along the way, it crosses Powerline Grade which, as the name suggests, is the right of way for electrical lines.  If you park at this intersection and walk south on Seaboard, you will come to another sump and ford.  This is a pleasant walk with plenty of wildlife activity if you are quiet.

Posted in Park, Park - Babcock Webb WMA | Tagged | Leave a comment

Shooting Closeups – Reversing Rings

Reversing rings are lens attachments that permit a lens to be turned around so that the front element of the lens is aiming into the camera and the rear element is aimed at the subject.

There are actually two types of reversing rings. One permits you to reverse a lens directly onto the camera body. The Nikon model for this is the BR-2 or BR-2A with the A model being used with newer film cameras and all Digital SLRs.

The other type reverses one lens onto another so that the lenses are facing each other. This type of reversing ring uses the filter threads to allow the connection. If you are using two lenses with different filter sizes then you will need a step up or step down adapter. This picture shows the two types of reversing ring. The top ring is the Nikon BR-2A reverse on camera ring. The bottom ring is a Bowers MC52-52 lens on lens reversing ring.

The lenses are a 55mm f3.5 Micro-Nikkor and the 18-55mm digital kit lens.

Reversed Lens on Body

First let’s look at a lens reversed on the camera with the Nikon BR-2A.  Since the 18-55mm f3.5-f5.6 lens is widely available today I will use it as the example.  Here is the reversing ring and the 18-55mm mounted on a D90.


Here it is shown with the reversing ring on the front of the lens.  Note that the reversing ring has the F-Mount bayonet flanges.  The next picture shows the 18-5mm reversed on the D90 body.  You can see the electrical contacts that allow communications and control between the camera body and the lens.  Since these are not connected in this position, all focussing and aperture control must be done manually.


Because of the loss of communications and connection, the camera can no longer control the aperture of the lens.  On Nikkors, this control is performed by the position of a lever.  The lever is normally in the closed (fully stopped down) position when the lens if off the camera.  Once mounted, a lever on the camera body holds the aperture open.  In normal on camera operation, when focussing or metering, the lever is held down to allow those function to be performed at full aperture.  When the shutter is released, the lever is permitted to move to a position which represents the desired shooting aperture.

When reversed, this is lost and we must control the aperture ourselves.  Unfortunately, the full range of f3.5 to f22 only takes a movement of about 1/4 inch.  I certainly can’t control this with any accuracy or precision so, the solution I use is to wedge the lever in the fully open position with a small piece of card.  Like this:


It certainly isn’t elegant but, the lens is now wide open and ready to use.  Nikon makes a BR-3A ring which mounts on the lens and allows the lever to be locked open or closed but, the bit of card works just as well.

So, how does it work?  Well, it does allow you to move much, much closer to your subject.  I set up a small demo with the D90 and reversed 18-55.  Here is what the setup looked like at 18mm.

The two pictures below show the ruler  at the minimum focus distance at 18mm and at 55mm.  The bottom pair show the closest focus I could achieve with the lens reversed at 18mm and 55mm.

Normal Mount 18mm image on the left, 55mm on the right


Now reversed in the same order


Surprised?  Notice that the 18mm position provides a much greater closeup capability.  In fact, it’s beyond 1:1.  Just as the position is reversed, the function is as well.  The WA side of the lens creates a larger image circle and your sensor is actually cropping it.

I apologize for the fuzziness of the WA image.  I didn’t have a remote handy as was pushing the shutter by hand.

Reversed Lens on Lens

I only have two lenses with 52mm filter sizes at the present time.  The 18-55 and the 55mm f3.5 Micro-Nikkor.  The 55mm is a non-AI lens and had never been modified.  I usually use it on a bellows but, that’s another topic for another time.  Just for demonstation purposes, I mounted the 55mm reversed on the 18-55mm.  As I expected, this was not a good combination.  While I did get slightly better magnification and retained exposure control the images were just small circles in the center of the sensor.  This method works best when the reversed lens is a wide angle.  But, just to show you how the rig looks, here it is.

And, the highly vignetted images that were the result of this are:


As I said, this was not a good combination for shooting and I only did this to show the configuration.  The 55mm f3.5 is an old Non-AI lens of metal construction and is heavier than the 18-55mm.  I was a bit hesitant to mount this and made sure the 18-55 barrel was as far back as it could go to make sure the weight didn’t hurt anything. 

After writing the above, I realized that I had an old 135mm f2.8 noname telephoto which could be used with the 18-55.  I dug it out and mounted it on the D90 with the 18-55 reversed at 18mm.  The results were now a lot better with a lot higher magnification.  I didn’t have much time to setup for various reasons but, the rig looked about the same while the images were no longer vignetted.


I had to invert the target ruler because the range was so close that I was bumping into the shelf it was on before achieving focus.  The viewfinder was very dim and the extra light was needed behind it.  But, as you can see, much higher magnification was achieved using a telephoto as the on-camera lens and a wideangle as the reversed lens. 

If you want to pursue lens to lens reversing, I would recommend the widest angle old lens with an aperture ring to use as the forward lens.  G mount lenses can be used since the actual aperture control will be on the camera side lens.

Posted in Camera Gear, Camera primers, Shooting closeups | Tagged | 4 Comments

Shooting closeups – Terminology

There is always a lot of interest in getting closer to a subject, particularly in nature photography. One reason is that getting closer reveals more detail and it is amazing how complex some seemingly simple things are. For example, there is often a confusion over the difference between WORKING DISTANCE and MINIMUM FOCUS DISTANCE .

The Working Distance is the distance between the front element of the lens and the subject.  Other things can change this,  For example, if you are using accessories like the Nikon R1 closeup lighting kit or a ringlight, the lights will be forward of the front element and will intrude into and reduce the working distance.  The working distance will also vary by magnification ratio.  In the case of the picture below, the lens is set to a 1:1 ratio and the working distance is about 6 inches.

Minimum Focus Distance is always marked as one of the specifications for a lens. What it means is the distance from the subject to the focal plane of the camera. The focal plane of a camera is the location that any lens is focused on. On film cameras, it was often called the film plane on digital, it’s sometimes called the sensor location or plane. The plane is marked on most cameras. The standard symbol is a circle with a line through it where the line is the location of the plane. Here is the focal plane mark on a D300.  You can see it on the left below and behind the top LCD.  On the D90, the focal plane mark is on the right side between the function dial and the prism.  It’s black on black so it’s difficult to see.  The minimum focus distance is always calculated or measured at the maximum magnification of the lens.  In this case, A 105mm f2.8 Micro-Nikkor that is 1:1  and the Minimum Focus Distance is about one foot.

The Magnification Ratio is a comparison of the image on the sensor or film plane and the actual subject.  If a lens has a magnification ratio of 1:1 it means that the image of the subject will be the same size as the original subject.  If the ratio is shown as 1:2 then the image of the subject will be one half the size of the original subject.  So, it’s easy to think of the colon as a slash and see that 1:2 is the same as 1/2 when reading specifications. So at 1:4 the image on the sensor would be 1/4 of the size of the original subject.

And, then there is Bellows Extension Factor.  With in camera metering  the bellows extension factor does not need to be calculated and the aperture adjusted to accomodate it.  We now get our light measurements at or near the focal plane so the loss of light from extending the lens forward is accomodated automatically.  That doesn’t mean it isn’t a factor. 

I often see posts on photography forums about lenses that don’t appear to be the proper aperture.  A typical complaint might be “I bought an f2.8 lens but I can only set it to f4.0 when I’m shooting macro.”  This usually occurs with an internal focus lens which doesn’t seem to be extending to focus.  The effect is the same though. 

In order to focus close, you have to move the lens closer to the subject than the focal plane.  As that happens, the amount of light at the plane is reduced by the inverse of the square of the distance (the inverse square law).  That means that if you are twice as far from the focal plane, you get only one quarter of the light energy on the sensor.  This actually happens at every focal length and magnification but becomes most apparent only in situations where the lens is extended far from the focal plane as it is in closeup work.  If you look at the figure below, the left rectangle represents 1 unit of light, in a straight line at twice the distance, the same amount of light energy is spread over 4 times the area.

Because of this, the effective aperture of a lens is reduced. Some lenses report this as a part of the cameras data included in pictures and some only record the nominal f-stop of the lens.

Posted in Camera Gear, Camera primers, Shooting closeups | Tagged | 1 Comment

Natural camoflage – Bagworm larvae

I am often surprised when I look closely at things and discover something that is not readily apparent. For example, this morning I went out to take a look at some of the garden plants to see what needed pruning. I was looking at one of the pineapple palms and thought I saw an odd spot on the bark. Although the bark is rough, the protrusions are relatively regular. This was outside of the pattern. Look at the picture on the left and see if you notice it.
 

The picture on the right shows the oddity in closeup.  Now, I see these from time to time on my palms.  They are really easy to find on the smooth trunk palms but, more difficult on the rough.  What this is is the larvae of a type of bagworm moth.  The eggs hatch in a web that looks like a translucent bag on the side of the tree.   The left photo here shows a hatching bag and the right another view of the larvae.  The larvae eat Lichens from the trunk leaving the black spots you can see above it but, at the same time, they cover their bodies with the lichens to blend in to the bark.  Nearly perfect protective coloration and much like a snipers ghillie suit in concept.


All shots with a Nikon D90, 60mm f2.8D Micro-Nikkor and SB-800 flash, 1/320 f11 or f16.

Posted in Uncategorized | Tagged | 1 Comment

Audubon-Pennington Park – Port Charlotte FL

Audubon-Pennington Park is a small, 7.9 acre preserve managed by the Peace River Audubon Society.  It has a small parking lot located at 1153 Alton Rd, Port Charlotte, FL. The entrance is via a very narrow passage in a fence and would not be possible in a wheelchair.

Although small, the habitat is diverse and includes canal side, swamp and hammock environments for a great experience in a small place.  The main trail is approximately 3/4 miles long but there are some nice loops and sidepaths that can be followed.

My local camera club scheduled an outing there today with an emphasis on sharing Macro and Close-up work techniques. We arrived early on a cool morning. I was hoping to find owls in some of the live oak trees but didn’t see any. The underbrush is pretty thick in the park but thre are places to get deeper into the woods off the path.  here are a couple of views of the path.


Even in summer, the shade makes this a nice place to walk and enjoy.  There are many large old Oak trees providing shade and a hanger for the Spanish Moss.  Many types of wildflowers can be seen in the undergrowth and along the path attracting many types of pollinating insects.  The Peace River Audubon Society schedules regular work parties to keep the occasional benches in good condition and the paths clear.

We did find one really fun  thing.  One of my friends asked me how I found the tiny spiders I sometimes showed the club.  I told him that tiny spiders spun tiny webs and all you needed to do was find them.  The saltbush seeds were flying everywhere so, it was easy to see where they were sticking in the fine webs.  We found one and were then surprised to see that it was literally filled with a new hatch of tiny spiders no more than 1 to 2 millimeters in size including the legs.  They were so clustered in the web that we found it difficult to isolate one for a picture.We took quite a few shots of them and then turned the target over to others as we walked around.  Later, we came by the same path and I decided to see if they had dispersed to make the shooting easier.  WOW, they were even tighter together than the first time.  It appears that a fly had stumbled into the web and it was party time.  The left shot here was the first sighting of the web and the right was taken on the re-visit.


Later, we found an interesting Larger Florida Mantis – Stagomantis floridensis which was kind enough  to pose for everybody who wanted a picture.  I used the opportunity to show a couple of folks how I used flash for handheld macros.

This is also a great park for plants.   If I had any interest in botany, other than knowing host species for some bugs, I could have spent all day just shooting wildflowers and plants.  The diversity in habitat and foliage is incredible for such a small plot.  I don’t usually shoot plants but, here is one of my equipment test shots from this morning.

Yep, everything was working OK and it was a great day in the woods. You can see more shots from Audubon Pennington as one of our club galleries.

Posted in Bug, Camera Gear, Park, Spider | Tagged | Leave a comment